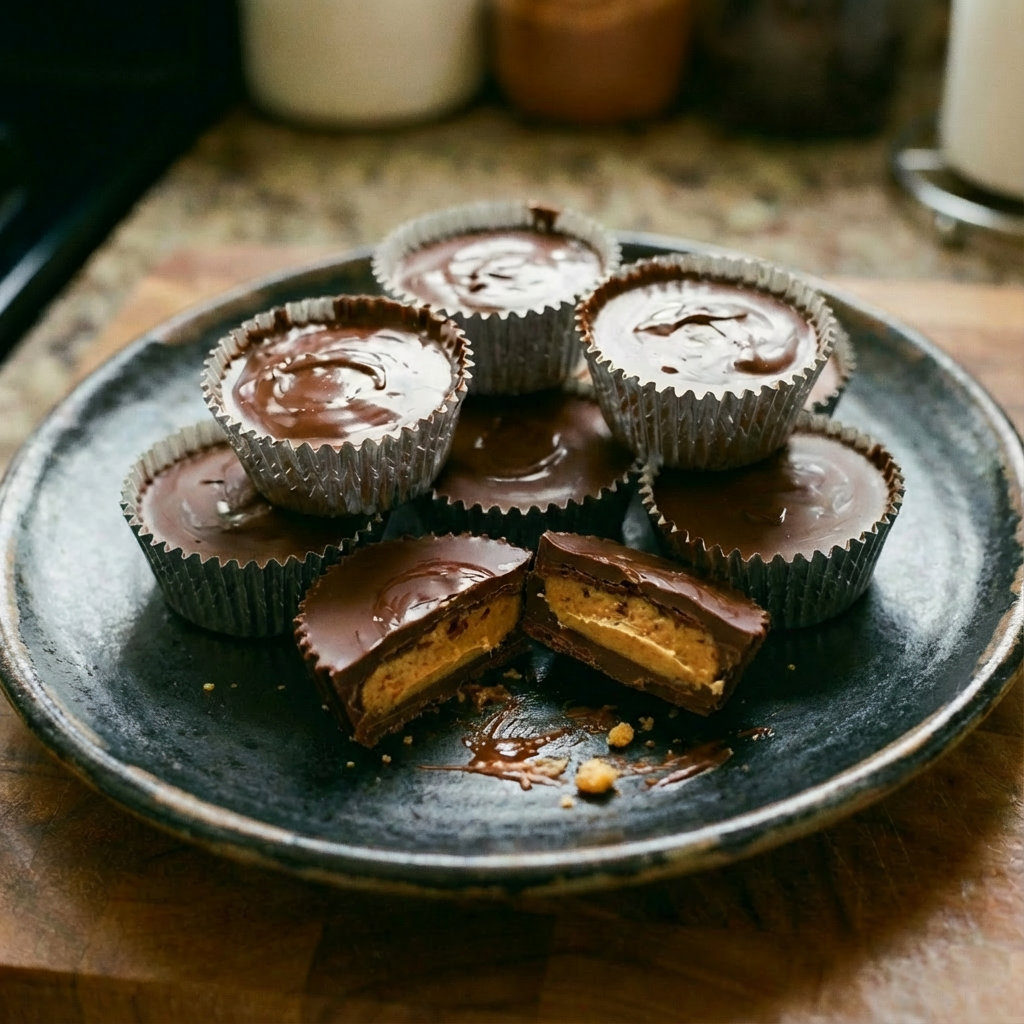
Experience the joy of making your own iconic candy from scratch. These Homemade Peanut Butter Cups capture everything you love about the classic—the snap of rich chocolate giving way to a creamy, sweet-and-salty peanut butter center—but with a deeper, more authentic flavor you can customize.
With just five simple ingredients and no special equipment, you can create stunning, gift-worthy treats in under an hour (plus chilling time). Using good-quality chocolate makes all the difference, and you control the sweetness and salt level of the filling. Once you taste these, you may never go back to the packaged version.
The Science of the Perfect Layered Shell
The secret to a professional-looking peanut butter cup lies in creating distinct, clean layers that don’t blend together. This is achieved through a tempered chocolate shell and a stabilized peanut butter filling. When you melt chocolate and add a small amount of coconut oil or butter, it creates a fluid mixture that sets with a glossy snap at room temperature.
The key is pouring a small amount into each liner first and letting it set slightly—this creates a firm base. The peanut butter filling is thickened with powdered sugar, which prevents it from being too runny and seeping into the chocolate shell. Chilling the filling layer briefly before adding the final chocolate top ensures the two layers remain separate. This controlled layering and chilling process results in the perfect, iconic candy structure.
Instructions
Prep
Line a 12-cup muffin tin or a 24-cup mini muffin tin with paper or foil liners. Set aside.
Make the Peanut Butter Filling
In a medium bowl, stir together the peanut butter, sifted powdered sugar, and salt until completely smooth and thick. It should have a play-dough-like consistency that holds its shape.
Melt Chocolate for the Base
Combine chocolate chips and ½ teaspoon of the coconut oil in a microwave-safe bowl. Microwave in 30-second bursts, stirring well between each, until completely smooth and fluid.
Create the Bottom Shell
Spoon about 1 teaspoon (½ teaspoon for mini) of melted chocolate into each liner. Use the back of a small spoon or a pastry brush to spread the chocolate up the sides of the liner, creating an even base and coating the sides about halfway up. Place the tin in the freezer for 10 minutes to set completely.
Add the Peanut Butter Layer
Once the chocolate shells are firm, remove from freezer. Roll the peanut butter filling into 12 small balls (24 for mini). Flatten each ball into a disc slightly smaller than your chocolate base and place one inside each set shell. Press down gently.
Seal with Top Chocolate Layer
Re-melt the remaining chocolate if needed, stirring in the remaining ½ teaspoon of coconut oil. Spoon chocolate over each peanut butter disc, spreading it to the edges to completely seal. Tap the tin gently on the counter to smooth the tops.
Garnish & Set
Immediately sprinkle a tiny pinch of flaky sea salt on top of each cup, if desired. Refrigerate the tin for at least 30 minutes, or until the chocolate is completely firm.
Serve & Store
Peel off the liners and enjoy! Store in an airtight container in the refrigerator for up to 2 weeks, or freeze for up to 3 months.
Pro-Tips for Perfect, Professional-Looking Cups
- Chocolate Quality Matters: Use good chocolate chips (like Ghirardelli or Guittard) or chopped baking chocolate for the best flavor and snap.
- Peanut Butter Choice: Use a standard, shelf-stable creamy peanut butter like Jif or Skippy. Natural peanut butter (with oil separation) will make the filling greasy and difficult to work with.
- Coconut Oil is Key: A small amount of coconut oil makes the chocolate more fluid for easy coating and gives the finished cups a beautiful glossy finish and clean snap.
- Coating the Sides: Taking the time to brush chocolate up the sides of the liner is what creates the classic “cup” shape with a complete chocolate shell.
- Work Quickly: Chocolate sets fast. If it begins to thicken while you’re working, re-melt it for a few seconds.
- Customize Them: Add a layer of crushed pretzels or graham crackers to the bottom shell before adding peanut butter. Use dark chocolate for a bittersweet contrast or white chocolate for a sweeter treat.
These Homemade Peanut Butter Cups are a simple, satisfying project with deliciously impressive results.