Cake pops are the ultimate transformation story in the dessert world—taking humble cake crumbs and turning them into enchanting, handheld delights. While they seem magical, they’re actually surprisingly simple with the right technique.
This comprehensive guide demystifies the process, revealing the secrets to achieving that iconic smooth coating, perfect spherical shape, and most importantly, preventing the dreaded crack or fall-off-the-stick disaster.
Whether you’re using leftover cake or baking one specifically for the purpose, these cake pops are a creative, customizable project perfect for parties, gifts, or a delightful baking afternoon. Master this method once, and you’ll unlock a world of edible cuteness.
The Science of Structural Integrity & The Perfect Dip
The success of a cake pop hinges on physics and temperature control. The cake and frosting mixture must be moist enough to bind but not so wet it becomes dense or greasy. The frosting acts as the edible glue, with its fat and sugar creating a pliable, moldable dough. When forming balls, compacting them firmly eliminates air pockets that expand during the chilling phase, which is the primary cause of coating cracks.
The freezing step is non-negotiable; it solidifies the fat in the binding, creating a stable, cold core. This is crucial because when you dip the pop into warm coating, the extreme temperature difference causes the coating to set almost instantly against the frozen center, locking the stick in place.
Using proper coating chocolate or candy melts—which contain stabilizers for smooth melting and setting—rather than plain chocolate, ensures a thin, workable viscosity that coats evenly without being too heavy, which would cause the pop to slide off the stick.
Ingredients & Equipment
For the Cake Pop Base:
- 1 baked 9×13 inch cake (any flavor, cooled completely)
- ½ – ¾ cup prepared frosting (cream cheese, vanilla, or chocolate)
For Coating & Decorating:
- 16-20 oz candy melts or chocolate almond bark (in colors of choice)
- 2 tablespoons coconut oil or paramount crystals (for thinning)
- Lollipop sticks
- Sprinkles, sanding sugar, or edible glitter
- Styrofoam block or cake pop stand for drying
Instructions
1. Crumble & Combine: In a large bowl, crumble the cooled cake into fine, even crumbs using your fingers. Add ½ cup of frosting and mix with a spatula or your hands until fully combined. The mixture should hold together when pinched, like damp sand. Add more frosting 1 tablespoon at a time only if needed.

2. Portion & Roll: Scoop mixture using a tablespoon or small cookie scoop (for uniformity). Roll each portion firmly between your palms to form a tight, smooth ball. Place on a parchment-lined baking sheet.

3. Chill the Balls: Freeze the cake balls for 15 minutes, then refrigerate for at least 1 hour (or freeze for 30 min). They must be very cold before dipping.
4. Prepare Coating & Insert Sticks: Melt candy melts according to package directions in a deep, narrow cup or glass. Thin with 1 tsp of coconut oil at a time until it reaches a smooth, lava-like consistency. Dip the tip of a lollipop stick about ½ inch into the melted coating, then immediately insert it straight into a chilled cake ball, pushing no more than halfway through. Let set for 60 seconds (the coating acts as glue).

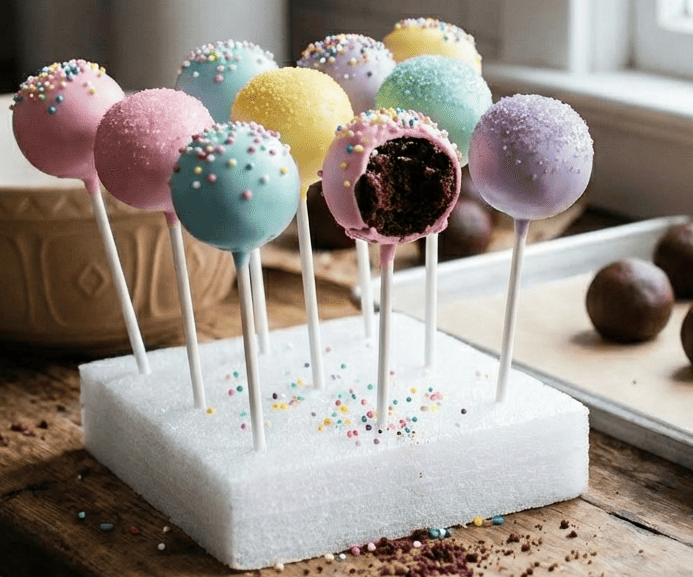
5. The Dip (The Key Step): Holding the stick, fully submerge the cake ball into the melted coating. Tap off excess by gently tapping your wrist while rotating the pop. Do not stir or swirl. Let any excess drip back into the cup.
6. Decorate & Dry: Immediately sprinkle with decorations while the coating is wet. To dry, stick the pop upright into a styrofoam block. Allow to set completely at room temperature until the coating is hard (about 15-20 minutes).

7. Storage: Store finished cake pops in a single layer in an airtight container at cool room temperature for up to 3 days, or refrigerate for up to 2 weeks.
Pro-Tips for Cake Pop Perfection
- The Frosting Ratio is Critical: Too much frosting creates a gummy, heavy pop that falls off the stick. Start with less; you can always add more.
- Chill, Then Freeze: Refrigerating firms the balls, but a brief freeze right before dipping ensures they stay on the stick.
- Melt Coating Gently: Use a double boiler or microwave at 50% power in short bursts, stirring frequently. Overheating will cause the coating to seize or become too thick.
- The Tap-Off Technique: Tapping your wrist (not the pop itself) is the gentlest way to remove excess coating and prevent a heavy, pooled bottom.
- Fight Cracks with Temperature: Cracks occur when the frozen center expands as it warms, bursting the set shell. Ensure your cake balls are VERY cold and your coating is not too hot (test on one first).
- Creative Variations: Use Oreo crumbs instead of cake, add food coloring to white candy melts, or drizzle with a contrasting color for professional flair.
With patience and these tips, you’ll create cake pops that are as sturdy as they are stunning.